It’s been a busy few months over here. With CMMC preparation in full swing, it’s been all about making sure our controls are defensible and our evidence holds up. I typically start from a NIST 800-171 rev.2 baseline so I’ve got a strong foundation to build on for compliance.
While reviewing my Azure Policy posture, I noticed something odd:
- My AVD Windows 11 multi-session deployments were coming back Compliant.
- But some test Windows 11 Enterprise VMs showed Not applicable for the guest configuration results.
- Even more confusing: Azure Policy still appeared to report those Windows 11 Enterprise VMs as Compliant at the policy level.
That mismatch (“Compliant” vs “Not applicable”) is exactly the kind of thing that can cause confusion, or worse, show up during an audit.
What the baseline content says (MOF filters)
My first gut reaction was to look at what the baseline was actually doing. The Windows baseline content uses filters to decide whether a given rule should be evaluated. In the MOF you’ll see both a ServerTypeFilter and an OSFilter, for example:
	ServerTypeFilter = "ServerType = [Domain Controller, Domain Member, Workgroup Member]";
	OSFilter = "OSVersion = [WS2008, WS2008R2, WS2012, WS2012R2, WS2016]";
At face value, that OS filter reads like “Windows Server only” targeting (the WS* values).
What the Guest Configuration agent logs show
Next I went to the Guest Configuration agent logs:
C:\ProgramData\GuestConfig\gc_agent_logs
On the Windows 11 Enterprise VM, the logs clearly show the engine skipping rules due to OS filtering:
Message : [win11ent]: [Audit Other Object Access Events] Not evaluating rule because it was filtered due to OS version
[2025-12-26 17:23:21.749] [PID 7840] [TID 9292] [DSCEngine] [WARNING] ...
On the Windows 11 multi-session VM, the same type of check was actually being processed:
ResourceID: Audit Other Object Access Events
Message : [win11multi]: LCM:  [ Start  Get ]  [Audit Other Object Access Events]
[2025-12-26 17:21:03.877] ... Invoking resource method 'GetTargetResource' ... class name 'ASM_AuditPolicy'
So in my case:
- Win11 Enterprise: rules get filtered “Not applicable”
- Win11 multi-session: rules run produces compliance results
Compare OS SKU signals (including ProductType)
To compare what Windows reports about each OS, you can pull basic OS info like this:
Get-CimInstance Win32_OperatingSystem |
  Select-Object Caption, Version, BuildNumber, ProductType
Microsoft documents Win32_OperatingSystem.ProductType as: Microsoft Learn
- Work Station (1)
- Domain Controller (2)
- Server (3)
This is useful context when you’re trying to understand how a configuration engine might be classifying a machine at evaluation time. (It doesn’t prove which internal mapping the baseline uses, but it’s an easy, consistent signal to capture as evidence.)


The documentation clue: this baseline isn’t intended for Windows 10/11
The big “aha” for me was in Microsoft’s baseline reference documentation. The Windows guest configuration baseline documentation explicitly states:
Azure Policy guest configuration only applies to Windows Server SKU and Azure Stack SKU. It does not apply to end user compute like Windows 10 and Windows 11 SKUs. Microsoft Learn
That statement lines up perfectly with why Windows 11 Enterprise would return Not applicable.
What didn’t line up (and what prompted the deeper dive) was why Windows 11 multisession was still producing evaluated results in my environment.
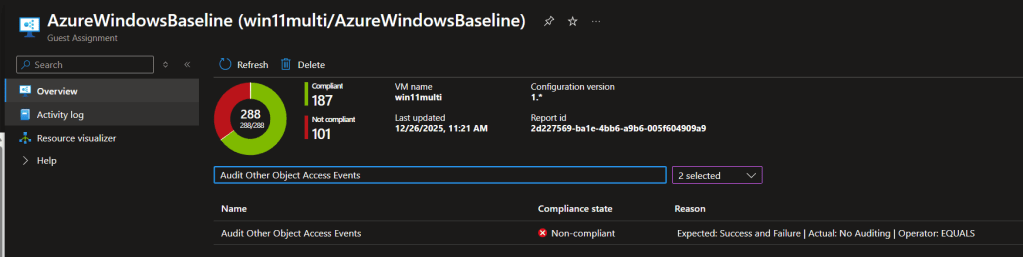
To drive the point of confusion home even futher, let’s take a look at the Guest Assignment. We can see the multi session OS is working, but the Enterprise image is showing compliant, but not applicable to that OS.

Closing the loop with Microsoft support
To close the case, I opened a ticket with Microsoft and shared:
- the MOF filter behavior,
- the Guest Configuration agent logs showing OS version filtering on Win11 Enterprise,
- and the fact that Win11 multisession was still evaluating rules.
Support escalated to product and confirmed (for my scenario) that the baseline behavior I was seeing was expected, and that documentation updates were planned to make this clearer where it works with the multi session OS, but not the Enterprise OS.
Takeaway: don’t assume “Compliant” means “evaluated.” “For audit prep, verify applicability and keep a record of what the agent actually assessed, especially when you’re mixing Windows 11 Enterprise and Windows 11 multi-session in the same compliance scope.