I had a few requests from my last article on how to remove all references of the access key from the application settings. Let’s take a look at how to achieve this.
When you provision a new Azure Function, it will create 2 settings with an access key:
WEBSITE_CONTENTAZUREFILECONNECTIONSTRING
AzureWebJobsStorage
We can rip out AzureWebJobsStorage and manually reference the correct endpoints for Azure Gov, but what about WEBSITE_CONTENTAZUREFILECONNECTIONSTRING? This is an Azure file share and managed identities are not supported. We can use an Azure Key Vault to store the connection information and use a managed identity from the function to connect into key vault. I am not going to reinvent the wheel as Microsoft published an article how to manually do this https://learn.microsoft.com/en-us/azure/azure-functions/functions-identity-based-connections-tutorial
What I did do was make it a bit more automated because doing this manually is a pain.
Edit the location where to read and write the files in the script (lines 22,29,31,38)
Run the script
This will swap out values that are required to do what that webpage is manually doing. It will also update the required app settings and roles once deployed. After this is running, you can now add your function apps and reference my other article on how to use managed identities. You can target the storage account provisioned or create a new storage account and go that route. Do note, this is written for Azure Government, so update the endpoints in the JSON file if you are in the commercial cloud. Cheers!
Out of the box, an Azure Function will setup its connections using an access key to talk with its storage account. If creating a new queue trigger, it’ll just setup the connection to use that same shared access key. That is not ideal and we should be using some form of AAD to authenticate. Let’s take a look at managed identities and how to actually make this work in Azure Government.
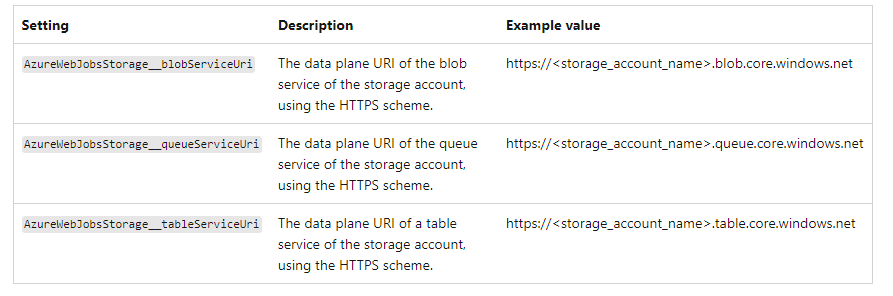
Straight out of Microsoft’s documentationIf you’re configuring AzureWebJobsStorage using a storage account that uses the default DNS suffix and service name for global Azure, following the https://.blob/queue/file/table.core.windows.net format, you can instead set AzureWebJobsStorage__accountName to the name of your storage account. The endpoints for each storage service will be inferred for this account. This won’t work if the storage account is in a sovereign cloud or has a custom DNS.
Well, Azure Government is nixed from this neat feature, but how do we use an identity based connection? We need to reference in the function configuration a new setting that says to use a managed identity when my trigger is a blob/queue. In my example, I want to use a storage account named sajimstorage with a queue called my-queue. Now, pay attention because here are the undocumented tidbits for Azure Gov. Your value needs to be in the format of AzureWebJobs[storageAccountName]__queueServiceUri. AzureWebJobs is static and must always be there, next comes the name of your storage account then 2 underscores along with queueServiceUri. The value should be the endpoint of your queue with no trailing slash!
Next, we must ensure the function.json connection name is set to the name of your storage account. This ties back to the value above which will be parsed out correctly by the function.
There are more steps, but I figured it would be easier to actually give an example.
Create a new Azure consumption function. I am creating a PowerShell Core runtime for this example.
Create your storage account you want to use the functions managed identity with.
In your function, enable the system assigned managed identity.
In your storage account you want to use the managed identity with, RBAC the roles Storage Queue Data Reader and Storage Queue Data Message Processor
Open up KUDU for your function and navigate in your debug console to site/wwwroot
Edit requirements.psd1 and add ‘Az.Accounts’ = ‘2.12.0’ Don’t uncomment ‘Az’ = ’10.*’ because it’ll bring every module and take forever. Just use what you need. Also, do not use 2.* for Az.Accounts because it breaks the managed identity. This is a longer discussion, but visit https://github.com/Azure/azure-powershell/issues/21647 and see all the on going issues. I was explicitly told 2.12.0 by Microsoft as well.
Edit profile.ps1 and add -Environment AzureUSGovernment to your connect-azaccount. It should look like this: Connect-AzAccount -Identity -Environment AzureUSGovernment
Back in the Azure Function Configuration, add a new application setting following the format of AzureWebJobs[storageAccountName]__queueServiceUri ie) AzureWebJobssajimstorage__queueServiceUri (2 underscores) and set the value to the endpoint of your queue: https://sajimstorage.queue.core.usgovcloudapi.net
Create your queue function app. It will default to using the shared access key, but let’s change that. Open the Code+Test, select the dropdown from run.ps1 and select function.json. Change the “connection”: “AzureWebJobsStorage” to “connection”: “sajimstorage” Change the queue name if you want. Out of the box, it is ps-queue-items, but I am going to change it to my-queue. Save your changes.
Restart your function from the overview.
Add a test message onto your queue and view the output from your function invocations traces.
Something to note, if you navigate to Integration and select your trigger, the storage account connection will be empty. This is normal.
It is not as painful as it looks. I mean, maybe when I was trying to figure this all out, but hopefully this saves you some time! Cheers.
We identified a regression with a version of DNC that was pushed out. We are currently rolling back now, and you should see your CNS pods functionality returning shortly if you have not seen it already.
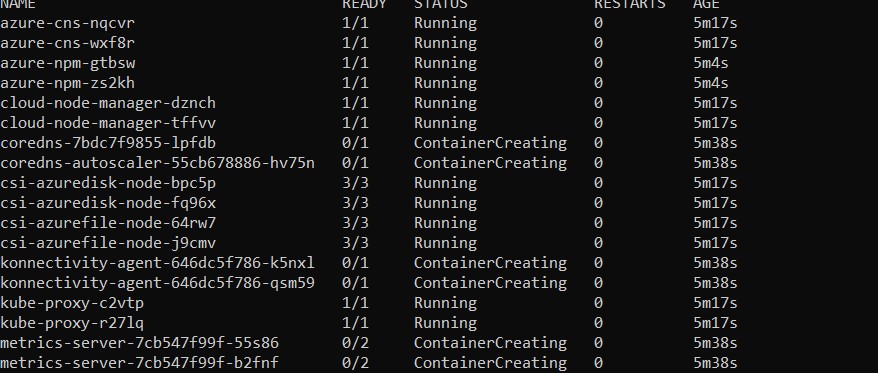
I finished up this past Friday rolling out a new AKS cluster and picked it up this morning. I added a new node pool and started getting errors with 4 specific pods:
I did a kubectl describe pod to see what is going on and it displayed:
I did change my outbound nat IP and thought it some how screwed something up. I wiped the cluster, reverted the nat change and redeployed, but no dice. I am going bonkers trying to figure out what happened. I reviewed both node and pod subnets to ensure I had enough capacity, which I did. I then went to another subscription and tried creating the same AKS cluster from my IaC, but the same thing happened. I had another user ping me that their cluster was having issues, but it resolved itself. I did look at their logs and it seems Microsoft must of done maintenance on the backend which moved some pods around. All their kube-system pods came back up healthy. So, what is different from their cluster and mine? I am using dynamic IP allocation and the other user is not. Alright, so let me try that. Guess what, it worked. This was all working fine last week, so there is something going on in Azure Government and I am waiting to hear back from Microsoft Support.
Microsoft offers a plethora of options for exporting usage out of Azure. You can then slice and dice the raw data and generate some reports. What happens if I don’t need to do all of that? What if I just like the out-of-the-box report that is presented in the Azure portal? I can either save this report and share it via a URL, or I can download it as a PNG and share that.
The former is pretty straight-forward, but how can I automatically download the PNG and send that out?
This diagram has a nice area chart, aggregated costs of each service, locations, and enrollment accounts. You can change the scope to a specific subscription or set the root management group to get all your subscription costs. This is exactly what I would want as a quick 1-page summary.
If you look at the ribbon bar, you can see “Download” and the option to download it as a PNG.
Looking at our network calls in the dev tools, you can see a call to the publish API, then another URL is returned that we call to actually download the PNG. This is exactly how the portal is generating your PNG for you to download and save.
Now that the PNG is being generated, the API will return a URL where to actually download the PNG when ready. We can get that URL from the response object as it is a synchronous call.
We now have two options for sharing our report. We can generate a private URL that the user must view, or we can generate the PNG and do whatever we want with it. You can easily use the Azure portal to build the report you want then view the JSON body to submit in your payload!
I am unsure if this is just a GCC High bug, but if you navigate to your SharePoint online admin portal and click on the migration link on the left side, you get an endless spinning icon.
My first thought was to check the dev tools to see if it was some how getting blocked, but all it showed was a status code of 200 doing a POST. Off to the AAD Sign-in Logs…
After filtering for my account, I saw a generic app is disabled message.
It didn’t dawn on me, but a co worker did see that the app was disabled in Enterprise Applications and under Microsoft applications. Thinking that was it, but nope, next error:
At this point, my gut was telling me something is wrong on Microsoft’s end. I popped a ticket and once they circled back to the SharePoint team, it is indeed a bug. So, how do you workaround this? Add /fileshare to the end of the URL.
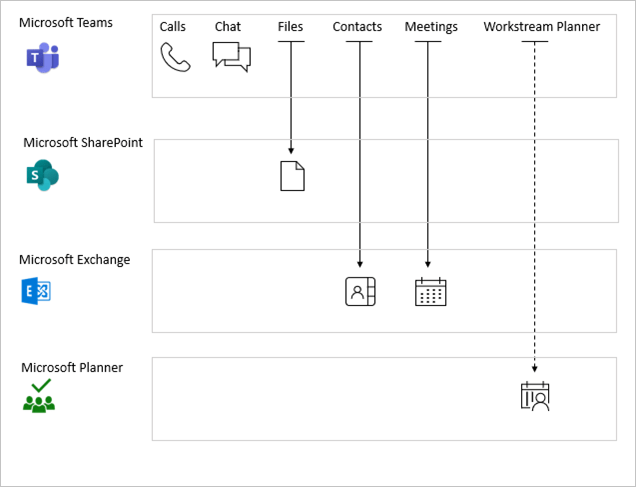
I was testing a couple of conditional access policies against specific Office 365 cloud applications and came across a weird situation when doing a what-if analysis. Let’s take a simple scenario of blocking access to Exchange Online if the user is is not in our trusted IP list. Doing a what-if analysis, it works as expected when I test my account against that application.
Now, let’s setup a CAP targeting Teams and do a what-if analysis.
Both Exchange and Teams CAP will be applied, even though I am only targeting Teams. After digging more into this, there are service dependencies for conditional access based on the application being used. Looking at Teams, the user needs to satisfy access to SharePoint and Exchange before signing into Teams.
Most organizations will target the Office 365 app and not individual applications in their CAPs. Just keep this little tidbit in the back of your head not to get blindsided when doing CAP work. 🙂
If you have worked with SharePoint Online, I am sure you are no stranger to PnP PowerShell module. It sits on top of graph, CSOM and the SharePoint Rest API which brings a lot of enhanced capabilities. Let’s look into an issue and how I solved it when it related to consuming this module in an Azure PowerShell Function.
There is a stable release at version 1.12.0 and a nightly build which is their preview at version 2.x.x-nightly. Typically, you would use the stable build, which is what I did in Azure. I loaded up that module in my requirements.psd1 file in Azure
I fired off a quick test where I connect to SharePoint online and I was presented with this:
After reading the 80+ comments, everyone was using a consumption plan. There was a fix being rolled out which you could verify with a consumption plan as you can see the runtime version being used. How about if you were not on a consumption plan, such as I? With GCC High, we’re always last for everything and I just assumed the fix wasn’t rolled out. I did provision a quick Azure Function consumption plan and noticed my runtime was set to the version 14.15.1 that fixed this issue. I deployed my code on there and it still didn’t work, but once I changed my module version to a nightly build, it worked. OK, great the issue is fixed. Now, how do I fix this on my App Service Plan? I cannot see the runtime version. I initially thought, maybe the runtime version was upgraded and I just needed to set a nightly build version in my requirements.psd1. I did that, but no dice. I then remembered about an issue I had a few years ago when CSS told me that upgrading your plan to a Pv sku will force it to move off the existing host. I did that and sure enough, everything started working. I then changed my plan back to the B sku and it was put on a host that seemed to have the updated runtime as well.
I am not making assumptions, but it seems Microsoft rolled out the fix, but not to existing hosts that have sites deployed on it or they are still rolling out to GCC High. I wish there was some kind of blog or link in the portal that said they are rolling out X. Long story short, if you need an updated runtime, just upgrade your plan then downgrade back to your original.
After spending too much time trying to figure out how to make the SharePoint Connector log into GCC High, I popped a support ticket. Microsoft quickly told me that it indeed does not work in GCC High, but should be available this year (2023). I had to laugh because the support rep said it would be quicker to implement the fix into GCC High than update the documentation. LOL, I’ve been working with Azure for so long that statement is 100% true.
Workaround? Power Automate. That stinks because it requires a license, but it is what it is.
I am a huge fan of Azure CycleCloud. It makes administration tasks so much easier. Now, there are some cons of running it in Gov Cloud, such as the core-hours does not work, but that isn’t much of a big deal if you deploy to a subscription and just calculate the costs from that. Let’s talk about using Slurm and Star-CCM. Microsoft published a whitepaper back in 2020 using a PBS cluster and version 14 of Star-CCM. I prefer Slurm and version 17 is out for Star-CCM, so let’s look at a more updated tutorial.
Microsoft recently updated CycleCloud to version 8.3 last month. You can find the releases notes here. Search the Azure Marketplace for CycleCloud and provision an 8.3 cluster. One thing to note and this sort of makes me question some default provisioning, but by default, it’ll give a public IP to your cluster. One of the mystery’s of CycleCloud is using this on an internal network, not exposed to the internet. Most orgs have a S2S vpn or express route into their vnet. For my demo, I am deploying into a spoke that has a peered hub connected back to on premise. When you provision the cluster, do not select a public IP and it’ll assign a private ip. More about this later when we deploy Slurm.
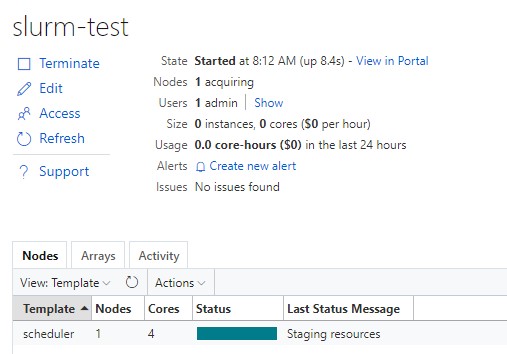
Once your cluster is up, navigate to https://<privateIp> and add your name, ssh key and subscription details. These steps are documented here. Create a new cluster and select Slurm within the CycleCloud UI. I called my cluster slurm-test
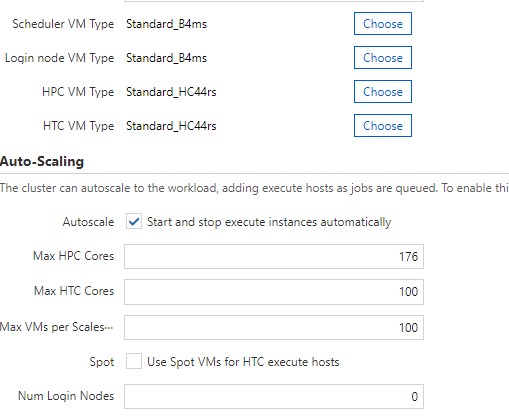
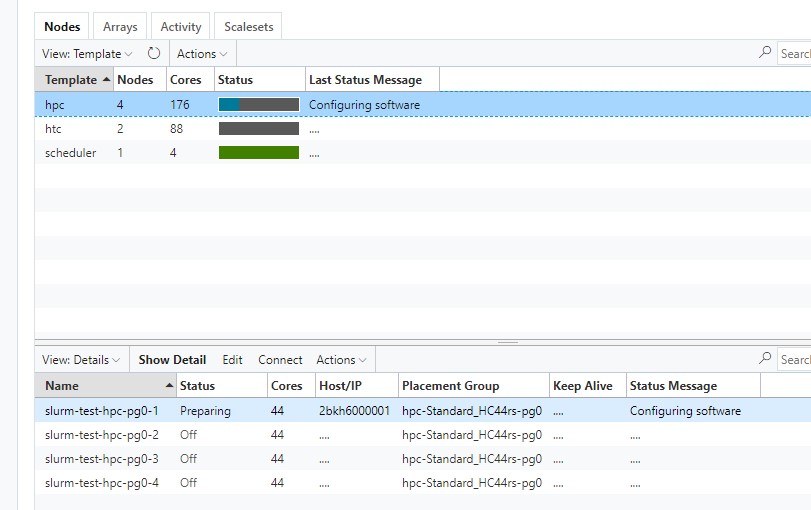
For required settings, I gave my scheduler and login node a VM type of Standard_B4ms. For my HPC and HTC VM sku, I am using an HC44rs. Since this is 44 cores per vm, I wanted a total of 176 cores which would give me 4 vm’s that I can submit jobs to.
In Required Settings, make note of your Default NFS Share. I provisioned 256GB since I have a rough idea of what my resulting sim files will be. The thing to note is that I had one heck of a time trying to expand this disk once the scheduler was provisioned. When you terminate the scheduler, it does not delete this disk. When you go to start your scheduler back up, it re-attaches this disk. I could resize it in Azure, but AlmaLinux was not seeing the new size. Maybe I was just doing something wrong, but I resized numerous disks in RHEL and CentOS in Azure with no issue.
In the Advance settings screen is where I want to talk about private networking. Uncheck Name as Hostname. This will write all the hostnames into its hosts file locally, so all the compute nodes and scheduler can talk together. My Vnet is using custom DNS and not Azure, so these nodes need a way to resolve to each other, hence unchecking that checkbox. Also, uncheck all the Advanced Networking checkboxes. This cluster will only be accessible from on premise and not the internet.
In the cloud-init configuration, let’s add some things for the scheduler and HPC. I am not using HTC, login nodes or an HA scheduler, so I am skipping using cloud init there.
The initial cloud init installs some requires packages I need for StarCCM and pulling some git files down. The thing to note are the 2 lines that write into the /etc/fstab. This is a bug and no idea why this wasn’t fixed in the 8.3 release. If you don’t add these lines in, when rebooting the scheduler, you won’t be able to SSH to it. Microsoft confirmed this for me via a support case.
At this point, we are ready to start our Slurm cluster. Hit the Start button and give it about 5-10 mins to provision a VM and install the software.
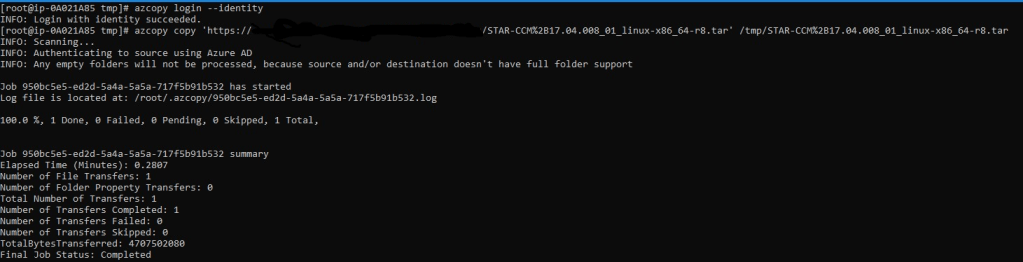
Once the scheduler is running, highlight it and select Connect to get your SSH command given out to you prepopulated with your username and IP. Once connected, copy down your Star-CCM file. I am using a managed identity from my scheduler to connect to a storage account. In my cloud init script, I install azcopy to make life easier to get files on and off the scheduler.
Before I install Star-CCM, I navigated to /shared and created an apps folder to hold my Star-CCM install and a data folder to hold my job files. Assign permissions to those 2 folders with the account you plan to execute jobs under (If you plan to run under root, which you shouldn’t, you’ll need to add 2 env var’s which Slurm will complain and tell you after doing a sbatch) With that, we can then untar the file and run a single command to silently install.
I have a license server already, so I am not installing it hence the installflex=false.
Alright, at this point, Star-CCM should be installed. Copy your .sim file to your scheduler. We need to create a sbatch script. I’ll provide a template here:
To sum it up, I am telling Slurm to run my submission on 1 node and use 44 cores available on that node. Give it a max runtime of 3 hours and call the job demo_test. The magic is executing starccm+ and specifying our batch system as slurm. That’ll take our #SBATCH settings above and use them.
Now, we can run a sbatch slurmtest.sh. We can check our job submission with squeue and see which node is being spin up. We can also check in the CycleCloud UI
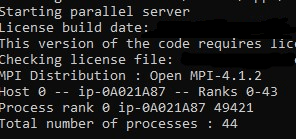
Once the actual vmss instance is started, it’ll create a log file on the scheduler that we set in our sbatch output. If we cat that file, you can verify we have all 44 cores being used.
Once the job is finished, it’ll save it in the same location where the case file was. It’ll be displayed in the output file as well.
What is really cool is that once the job finishes, CycleCloud will spin down the HC44rs vmss instance it created, so we aren’t paying for these large HPC vm’s when not using it. StarCCM pairs really well with Slurm and CycleCloud. I highly recommend it!
I was doing a POC around AVD in Gcc High and wanted to implement autoscale. Reading Microsoft’s documentation, the new autoscale is not in GCC High. I had to either write my own, use some 3rd party solution or leverage their original logic app/runbook solution. I opted using Microsoft’s original solution, but of course, it seems this is no longer being updated. It uses RunAs accounts which MS will retire on 9/30/2023.
I don’t understand why they just don’t update the solution to use a managed identity, but oh well. Not knowing if their new autoscale will make it to GCC High, I updated it to do a couple of things worth sharing.
The first thing we need to do is deploy the logicapp/automation account solution. It will deploy an automation account, upgrade some modules and deploy a logic app. We will want to make sure the system managed identity is enabled on the automation account and assigned the contributor role to the subscription. Opening up the runbook deployed, find
add -EnvironmentName AzureUSGovernment if you are hitting GCC High.
I commented out $ConnectionAsset = Get-AutomationConnection -Name $ConnectionAssetName as we aren’t using a runas account anymore. In your logic app, you can just make the request parameter empty “ConnectionAssetName”: “”
At this point, we’re using a managed identity to log in. Great, but let’s start thinking why we are using this solution. Yes, we need more VMs to satisfy user load, but it is also a cost savings tool. If the VMs will shut down at night, why pay for Premium_LRS disks? We can easily add a function that converts the disk at shutdown and startup.
I added a simple function to the runbook:
function Set-AvdDisk {
    param (
        [string]$rgName,
        $vm,
        [ValidateSet("Standard_LRS", "Premium_LRS")]
        [string]$diskSku
    )

    if ($convertDisks) {
        if ($vm.PowerState -eq 'VM deallocated') {
            write-output "VM $($vm.Name) is deallocated, checking disk sku"
            $vmDisk = get-azdisk -ResourceGroupName $rgname -DiskName $vm.StorageProfile.OSDisk.Name
            if ($vmDisk.sku.name -ne $diskSku) {
                write-output "Changing disk sku to $diskSku on VM $($vm.Name)"
                $vmDisk.sku = [microsoft.Azure.Management.Compute.Models.DiskSku]::new($diskSku)
                $vmDisk | Update-AzDisk
            }
        }
    }
}
I just call that function in the foreach loop when the runbook starts a VM up:
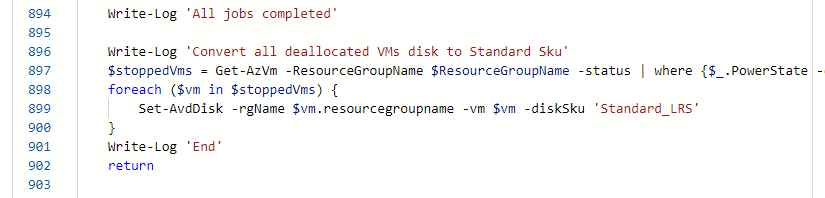
That will ensure the disk is Premium sku when starting the VM up, but what about shutdown? That is the real cost saving. At the end of the script when all jobs are completed, I just run a simple powershell script that pulls back all the deallocated vm’s and runs the function above to convert the disks back to Standard_LRS.
    Write-Log 'Convert all deallocated VMs disk to Standard Sku'
    $stoppedVms = Get-AzVm -ResourceGroupName $ResourceGroupName -status | where {$_.PowerState -eq 'VM deallocated'}
    foreach ($vm in $stoppedVms) {
        Set-AvdDisk -rgName $vm.resourcegroupname -vm $vm -diskSku 'Standard_LRS'
    }
When the runbook starts and a scale up or down action hits, you can see the result in the output of the job. The screenshot below is turning on a VM. It will change the disk sku back to Premium_LRS for that specific vm before starting it up.
Here is a screenshot of a VM being deallocated which you can see the disk being set to Standard_LRS to reduce cost.
Feel free to modify the script. I’ll honestly say that it took me 5 mins to put this together, so there is room for improvement, but this shows that the functionality will work. I’ll eventually get around to making this better, things like tag support to skip disks for some reason, but for now, enjoy.